Learning Goals
At the end of this Tutorial, you will be able to:
- Using ChatGPT to populate arrays, and to create code for reading and filtering arrays.
Introduction
In this Tutorial, you will use ChatGPT to help you build a ReactJS app for listing the world's top 10 soccer players.
You will add functionality to the app for deleting players from the list and displaying an individual player's full details.
Getting started with create-react-app
Follow these steps to build the basic app scaffolding with the create-react-app script.
- Open a new Command Prompt or VS Code Terminal.
- Navigate to the folder where you want to create your app. For example:
C:\>myapps
- Type the following command that includes the name you want to call your new app. For example, ai-array-app.
npx create-react-app ai-array-app
After the script has created your app, launch it by running the following command from inside your new app's root folder.
npm start
A new browser window should display with your new app running on your ReactJS local development server. If not, open a new browser tab and enter http://localhost:3000.
You will see a screen similar to the following.
Customising the CRA boilerplate content
Next, you will customise the 'boilerplate' content and files generated by the create-react-app script.
- Download the NodeJS file below to the folder that contains your app. replaceBoilerplate.js
- Open a new Command prompt or VS Code Terminal, navigate to your app's root folder, and run the command below.
node replaceBoilerplate.js
In the /public and /src sub-folders of your app, you can see this command updates the content of the core files and deletes unnecessary ones.
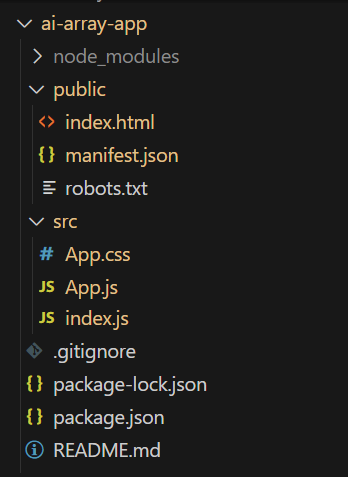
In the /public folder of your new app, open the index.html file and update the <title> tag to "Top 10 Soccer Players".
Using ChatGPT to create content and code
Your app will work with data stored in arrays. You will use ChatGPT to create and populate a simple array as follows.
1: Assign a persona and save a named chat session
Here are the steps:
- Access ChatGPT and click the New chat icon.

- Paste and run the prompt below.
You are an expert developer and instructor in ReactJS. Your task is to help me generate data structures, functional components and code snippets that will form part of ReactJS apps. I have already built the basic scaffolding for an app with the "create-react-app" script. Please respond with "Read" to acknowledge. - ChatGPT should respond as shown below.

- In the left sidebar, give this chat session a descriptive name. For example, Arrays in ReactJS.

2: Create, import, and list the array
You will now ask ChatGPT to begin creating files and generating data for your new app.
- Enter the prompt below.
Please perform the following two tasks:


1 - Create an array named "arrPlayers" that contains the first and last names of the 10 top soccer players. The array will be stored in a JavaScript file named "players.js" that will be located in the "src" folder of my ReactJS app.


2 - Create an "App.js" component that imports the above "players.js" file and displays the array in a list. Do not add any other import statements to this "App.js" component. - In the /src folder, create a new file named players.js and paste the first ChatGPT response into it.
- Next, paste the second ChatGPT response into your App.js file.
- Your web browser output should now look similar to that shown below.

About keys, indexes, and the array.map() method
In ReactJS, the array.map() method is the standard way of iterating (looping) through arrays. In the above example, ChatGPT may have responded with a list performed by a single line of code as follows:
<div>
    <h1>Soccer Players</h1>
    <ul>
        {arrPlayers.map(player => <li key={player}>{player}</li>)}
    </ul>
</div>
The key is not displayed on screen - but internally ReactJS requires the key for the loop to work. If you remove the key, your web browser console will display an error like that below.

No key, no map loop.
In the above case, each data item (that is, each soccer player) is treated as its own key.
Alternatively, ChatGPT may have responded with the following loop code.
{arrPlayers.map((player, index) => (
    <li key={index}>{player}</li>
))}
This second version uses the index position of each item (0-19) in the array as the key for the loop. The output is the same. But now you could display this index value in the web browser as follows:
{arrPlayers.map((player, index) => (
    // Displaying both index and player name, 0 to 19.
    <li key={index}>{index} - {player}</li>
))}
Update your App.js file to use <p> paragraph tags and display the index value (incremented by 1) for each player.
function App() {
return (
<section className="w-820px">
<h2>Top 10 Soccer Players</h2>
{arrPlayers.map((player, index) => (
<p key={index}><b>{index + 1}</b> - {player}</p>
))}
</section>
);
}Your web browser output should now look as shown below.
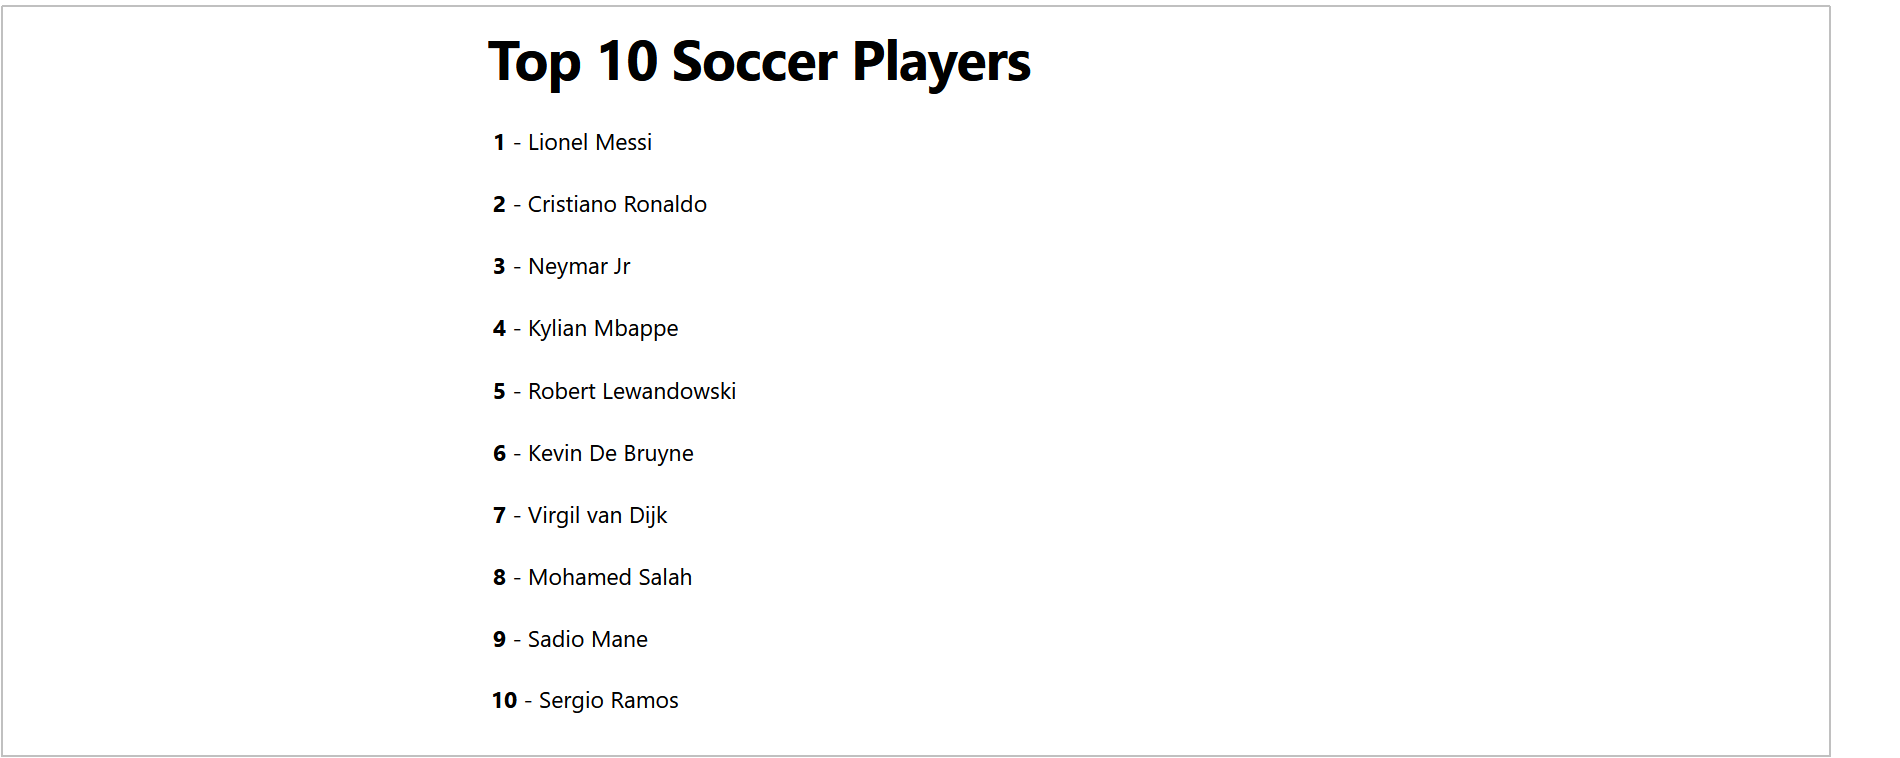
Simple arrays where the individual data items do not have unique IDs limit the functionality that can applied in ReactJS.
- Data items as keys are a bad idea: Multiple data items - such as user names or product titles - may be duplicates.
- Array positions as keys are a bad idea: The position of items in an array may change over time. Also, you may want to work with copies of an array that includes only some of the original items. In such cases, the index of an item in the copied array will be different to its index in the original array.
In summary, for ReactJS to be able to select, filter, sort, update, create and delete data items, it is best to use data structures where individual data items each have unique IDs.
Working with arrays of objects
Most commonly in ReactJS, the arrays you will work with will be arrays of objects. See an example below.
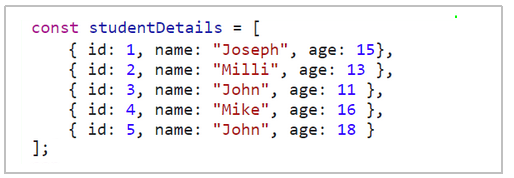
Each object in the array has a unique identifier. In the above example, this is the id property of each object.
1: Recreate the data as an array of objects
Follow the steps below:
- Enter the following prompt.
Recreate the "players.js" file to make it an array of objects. Each player will be an object. For each player, include the following properties:


id: This will also be the rank position of the player

firstname:

lastname:

age:

club:

trophies:

nationality:

bio: A summary biography of each player of about 250-300 words in length - You may need re-prompt ChatGPT a number of times as follows.
Please continue - Next, enter:
(This may not work.)
Can you combine the data for the top 10 players into a single file - Copy the new data from ChatGPT into your players.js component file. Alternatively, download the file below into your /src folder to overwrite the older version of this file. players.js
- Enter this prompt into ChatGPT to update how the new array data is displayed.
Rewrite the "App.js" component to display the data from "players.js" as follows:


1 - Create an HTML table with a head and a body section.

2 - In the table head row, create cells to contain the titles of "Rank", "Name", "Trophies", "Club", "Nationality", and "Details".

3 - For row in the table body:

 * in cell 1, display "id"

 * in cell 2, display "firstname" and "lastname". Also display "age" in parenthesis.

 * in cell 3, display "trophies"

 * In cell 4, display "club"

 * In cell 5, display "nationality"

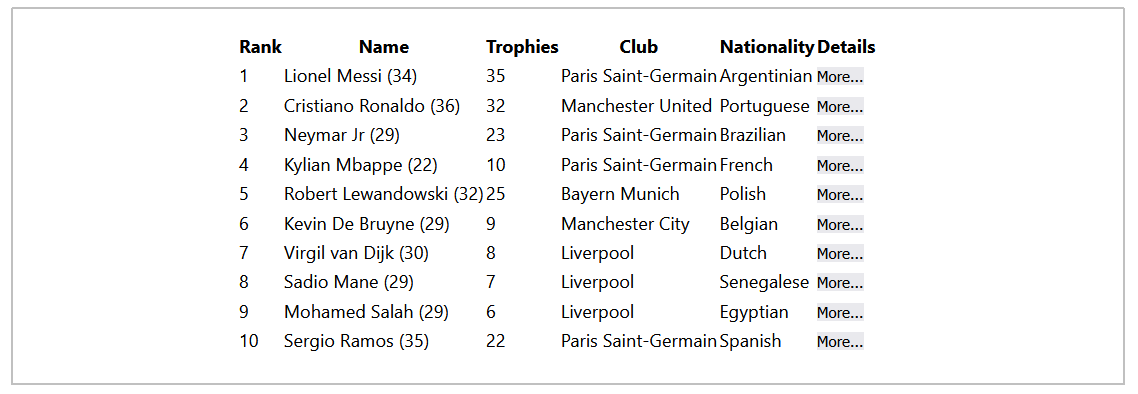
* In cell 6, display a button element with the text "More..." - Copy the response from ChatGPT into your App.js file. The web browser output should look as shown below.
2: Update the CSS
Next, add some styling to how the data table is displayed. Follow these steps:
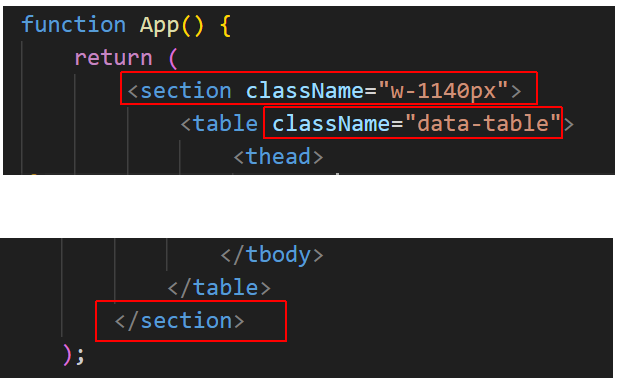
- Update the HTML that wraps around the <table> tag as shown below.
- Copy the CSS below to the end of the App.css stylesheet.
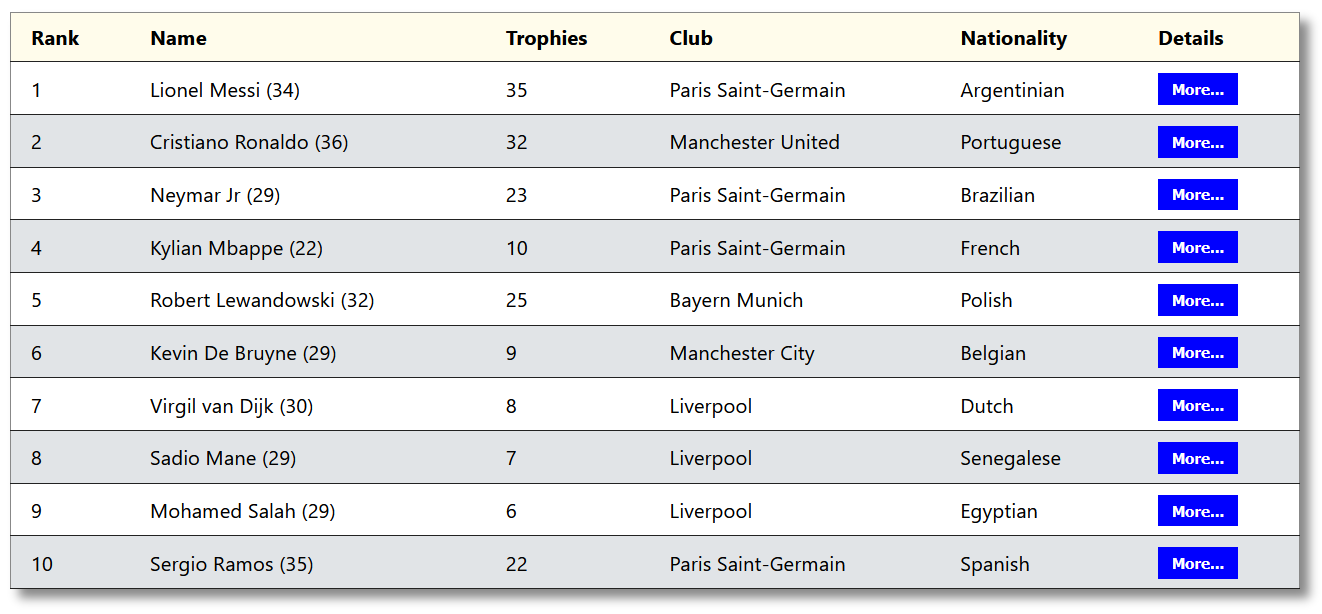
/* Tables */ .data-table { border-collapse: collapse; font-size: 18px; width: 100%; overflow: scroll; margin-bottom: 56px; border: solid 1px #888; box-shadow: 8px 8px 8px #888; } .data-table th, .data-table td { padding: 8px 18px; border-bottom: solid 1px #222 } .data-table th { background-color: #fffceb; font-weight: 700; text-align: left; } .data-table tr:nth-child(odd) { background-color: #fff } .data-table tr:nth-child(even) { background-color: #E1E4E7 } .data-table tr button { padding: 6px 12px; background-color: blue; color: #fff; font-weight: bold; } .data-table tr button:hover, .data-table tr button:focus { background-color: darkblue; }
Your browser output should now look similar to that below.
Creating a child component
All your app’s code should not be in the main App.js file. Add a new component file named listplayers.js as follows:
- Enter the prompt below in ChatGPT.
Please create a new component file named "listplayers.js" that will be located in the /src folder. In this file, create a function named ListPlayers to perform the data listing operation that is currently in the App.js component. Update the App.js component to import the new ListPlayers component as a child component. - Copy-and-paste the responses in your app. Preserve the HTML formatting
Your new listplayers.js file should look as follows.
import { players } from './players'; // Import players data
function ListPlayers() {
return (
<section className="w-1140px">
<h2>Top 10 Soccer Players</h2>
<table className="data-table">
<thead>
<tr>
<th>Rank</th>
<th>Name</th>
<th>Trophies</th>
<th>Club</th>
<th>Nationality</th>
<th>Details</th>
</tr>
</thead>
<tbody>
{players.map(player => (
<tr key={player.id}>
<td>{player.id}</td>
<td>{player.firstname} {player.lastname} ({player.age})</td>
<td>{player.trophies}</td>
<td>{player.club}</td>
<td>{player.nationality}</td>
<td><button>More...</button></td>
</tr>
))}
</tbody>
</table>
</section>
);
}
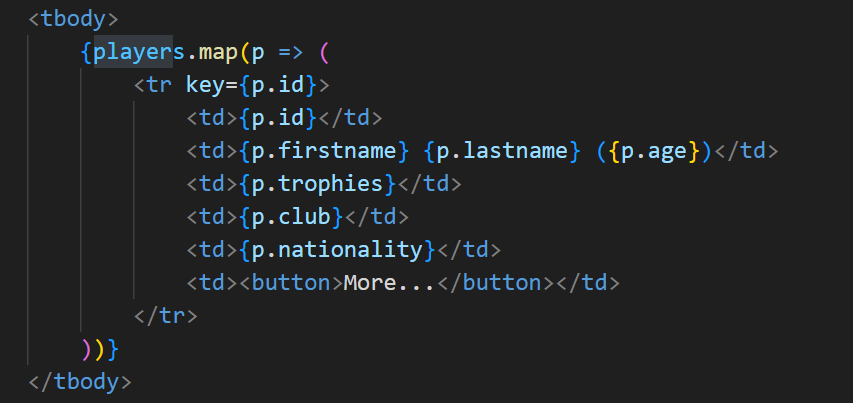
export default ListPlayers;You could rewrite the above table output more concisely as follows.
And your refactored app.js file should look as follows.
import ListPlayers from './ListPlayers'; // Import the ListPlayers component
function App() {
return (
<ListPlayers />
);
}
export default App;This new parent-child structure follows the ReactJS principle of component-based architecture, making your app more modular and maintainable.
Displaying a player's details
Your next task is to add functionality to the More... button in the displayed table. Here are steps:
- Enter the following prompt in ChatGPT:
Create a new component file named "displayplayer.js" that will be stored in the /src folder. In this file create a function named DisplayPlayer that will accept a played id as a prop and then display the full details of that player from the players array. - Create displayplayer.js in your /src folder and copy the ChatGPT response into it. See below.
import { players } from './players'; // Import the players array function DisplayPlayer({ playerId }) { // Find the player with the matching ID const player = players.find(player => player.id === playerId); // Render player details or a message if not found return ( <section className="w-1140px"> {player ? ( <> <h2>{player.firstname} {player.lastname} ({player.age})</h2> <p><b>Club</b>: {player.club}</p> <p><b>Nationality</b>: {player.nationality}</p> <p><b>Trophies</b>: {player.trophies}</p> <p><b>Bio</b>: {player.bio}</p> </> ) : ( <p>Player not found.</p> )} </section> ); } export default DisplayPlayer;
The array.find() method returns the first element in the provided array that satisfies the test condition. Because we are dealing with unique id properties, this is fine.
const player = players.find(player => player.id === playerId);Or, more concisely.
const player = players.find(p => p.id === playerId);If no object in the array satisfies the test condition, array.find() returns undefined.
To deal with this situation, you could add an if .. else clause to display a message. This is an example of conditional rendering.
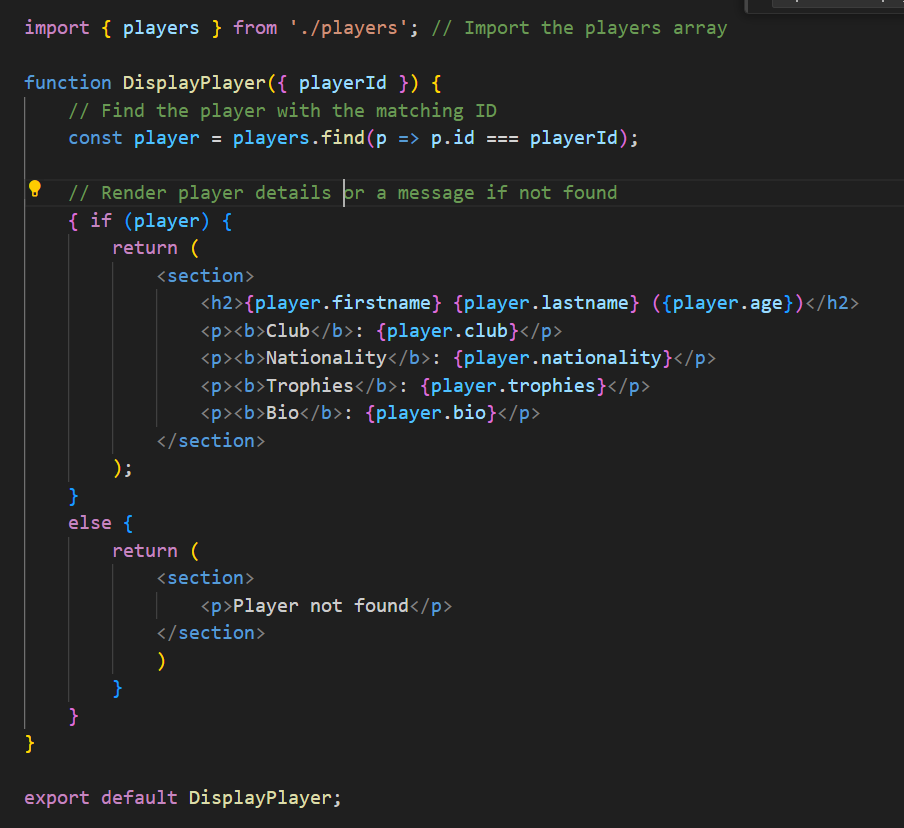
However, this approach needs two return statements. A more concise syntax is available with the ? : ternary operator.
Adding an onClick event to the table button
The next step is to add a function named handleMoreClick() or similar to the More... button that will be activated by a user click. This will accept the relevant player.id prop or argument. Something like this ...

However, when you pass a prop to an onClick function, ReactJS requires that it includes an inline arrow function. See below.

Calling the DisplayPlayer component
Your handleMoreClick function needs to call the DisplayPlayer component that will then show the complete details of the selected player.
You could define handleMoreClick as an anonymous function at the top of the ListPlayers function component. See below.

This will not generate any errors - but it will not change the output in the web browser. To do that, you need to change state within ListPlayers with the useState hook.
Instead, add the following at the start of the ListPlayers function.
const [selectedPlayerId, setSelectedPlayerId] = useState(null);
const handleMoreClick = (playerId) => {
setSelectedPlayerId(playerId);
};And include this import statement at the top of the file.
import { useState } from 'react';
After the closing </table> tag in the JSX, add this new line to display the selected player.
{<DisplayPlayer playerId={selectedPlayerId} />}Your ListPlayers component will now look as shown below.
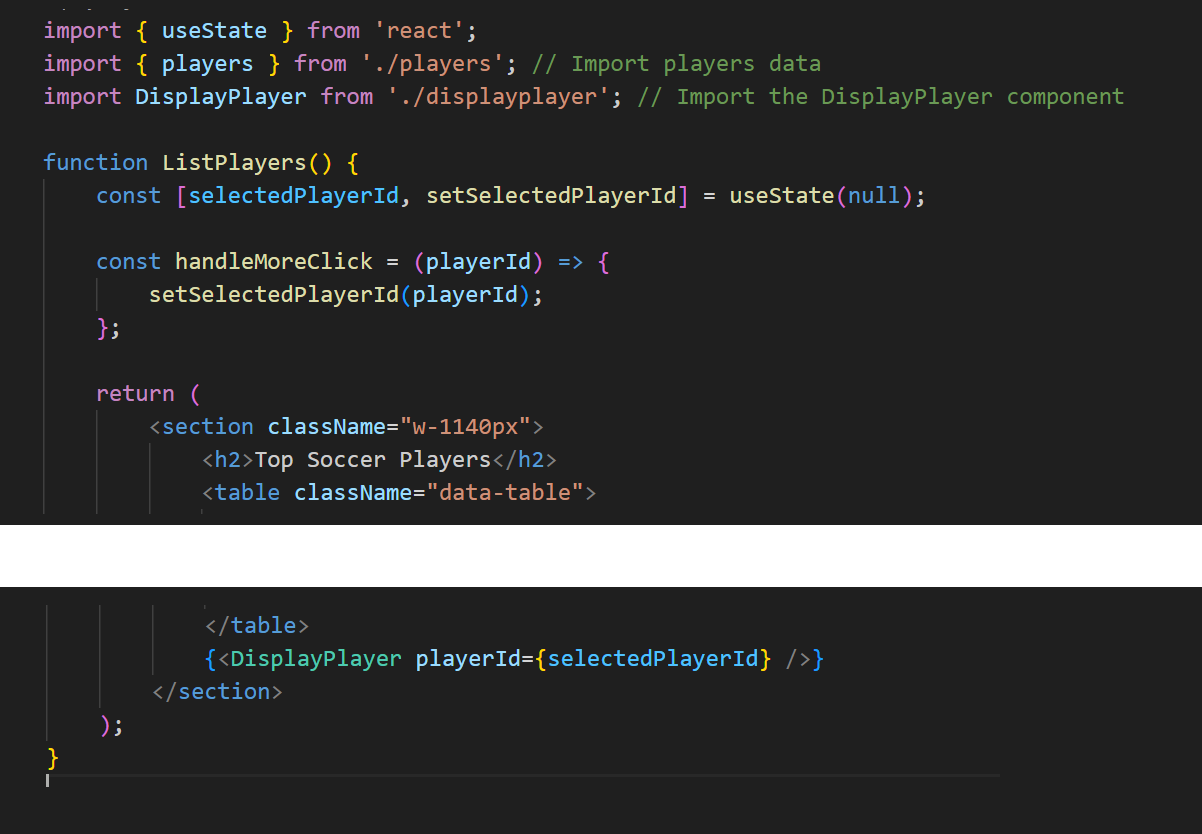
Finally, add a condition so that the DisplayPlayer component is called only if a selectedPlayerID exists.

In JavaScript, true && expression always evaluates to expression, and false && expression always evaluates to false.
Therefore, if the selected selectedPlayerId property exists, the element after && will appear in the output. If it is false, ReactJS will ignore and skip it.
The above code should be generated by ChatGPT in response to the prompt below.
Update the ListPlayers component so that, when the user clicks the button in any row, the app then renders the DisplayPlayer component.Deleting a player
Next, add the option to delete a player from the list. Here is the prompt to enter to ChatGPT.
Perform these two updates to the current ListPlayers component:


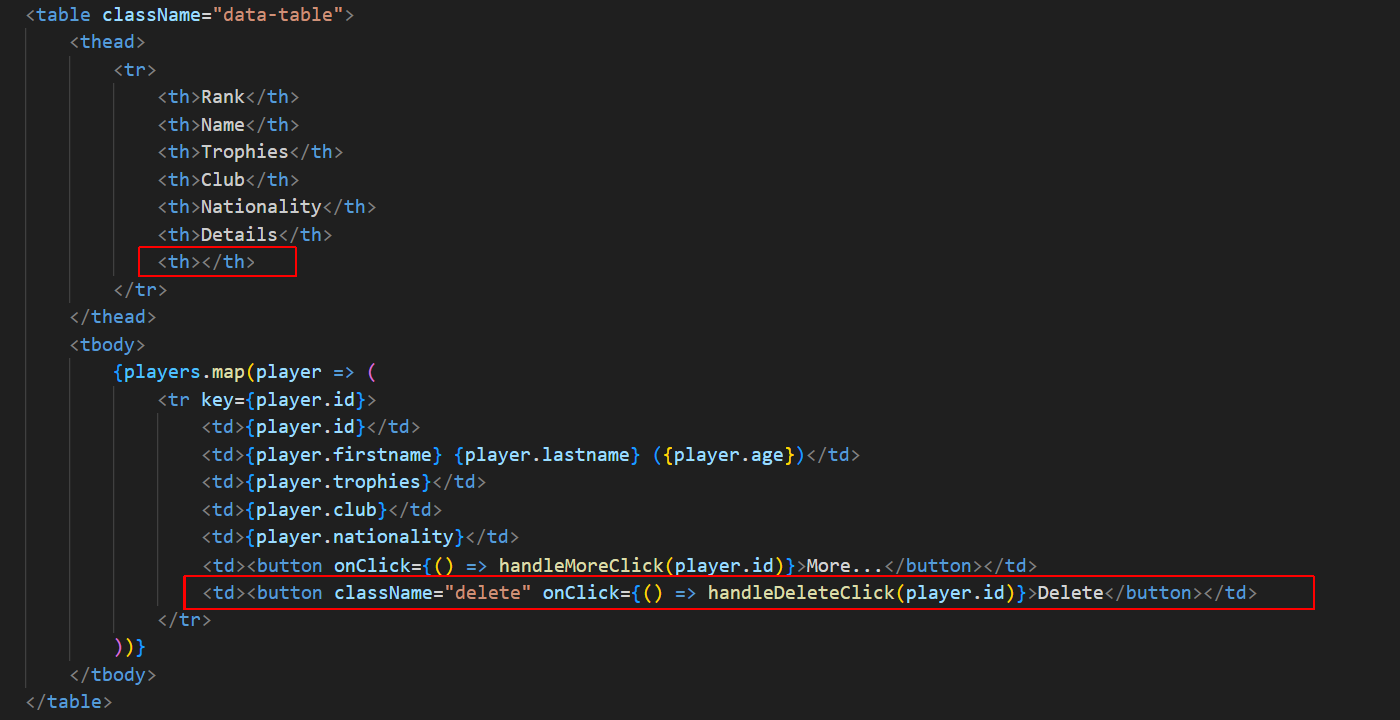
* Add a new column to the table. The cell in the table head should be empty. For each row in the table body, add a button in the new with the text of "Delete". Attach an onClick function to the button that calls a function named handleDeleteClick for the selected player.


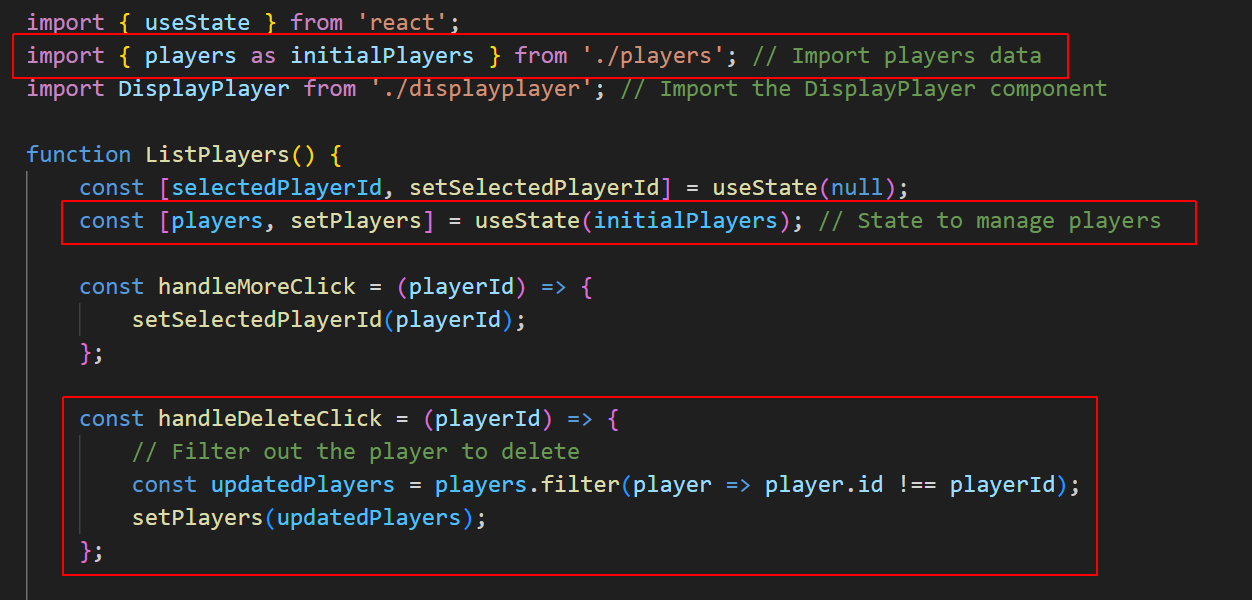
* Add a new function named handleDeleteClick that accepts the player id as an argument. This function should remove the player from the players array. The function should then update the state of the ListPlayers component to reflect the change in the players array.
With the new row added, your <table> should look similar to the following.
You will need to manage the state of the players array. This array will now output an initial value on first render and later display other values when players are deleted.
Finally, add this style rule to the end of the App.css file.
.data-table tr button.delete {
    background-color: red;
}
Toggle the display of components
Currently, your browser output can display both the list of players and the details of a selected player at the same time. Let's change that. Here is the prompt for ChatGPT.
Add a feature to the List Component that will toggle the display of the players list or the display of the player details.


When the players list is displayed, the selected player details are hidden. And when the player details are displayed, the players list is hidden.


Also, when the player details are displayed, add a button that, when clicked, will re-display the players list.
You will need to add an additional state named showPlayerDetails to toggle between displaying the player list and the player details. When true, the player details are displayed along with a "Back to List" button. Otherwise, the players list is displayed.
You will also add a "Back to List" button in the DisplayPlayer component to switch back to the players list view. This button calls handleBackToList to set showPlayerDetails to false.
The handleMoreClick now also sets showPlayerDetails to true.
Here is the complete code.
import { useState } from 'react';
import { players as initialPlayers } from './players'; // Import players data
import DisplayPlayer from './displayplayer'; // Import the DisplayPlayer component
function ListPlayers() {
const [players, setPlayers] = useState(initialPlayers);
const [selectedPlayerId, setSelectedPlayerId] = useState(null);
const [showPlayerDetails, setShowPlayerDetails] = useState(false);
const handleMoreClick = (playerId) => {
setSelectedPlayerId(playerId);
setShowPlayerDetails(true);
};
const handleDeleteClick = (playerId) => {
const updatedPlayers = players.filter(player => player.id !== playerId);
setPlayers(updatedPlayers);
};
const handleBackToList = () => {
setShowPlayerDetails(false);
};
return (
<section className="w-1140px">
{!showPlayerDetails ? (
<>
<h2>Top 10 Soccer Players</h2>
<table className="data-table">
<thead>
<tr>
<th>Rank</th>
<th>Name</th>
<th>Trophies</th>
<th>Club</th>
<th>Nationality</th>
<th>Details</th>
<th></th>
</tr>
</thead>
<tbody>
{players.map(player => (
<tr key={player.id}>
<td>{player.id}</td>
<td>{player.firstname} {player.lastname} ({player.age})</td>
<td>{player.trophies}</td>
<td>{player.club}</td>
<td>{player.nationality}</td>
<td><button onClick={() => handleMoreClick(player.id)}>More...</button></td>
<td><button className="delete" onClick={() => handleDeleteClick(player.id)}>Delete</button></td>
</tr>
))}
</tbody>
</table>
</>
) : (
<>
<DisplayPlayer playerId={selectedPlayerId} />
<button onClick={handleBackToList} className="back-to-list">Back to List</button>
</>
)}
</section>
);
}
export default ListPlayers;Your final list players screen should look as follows.
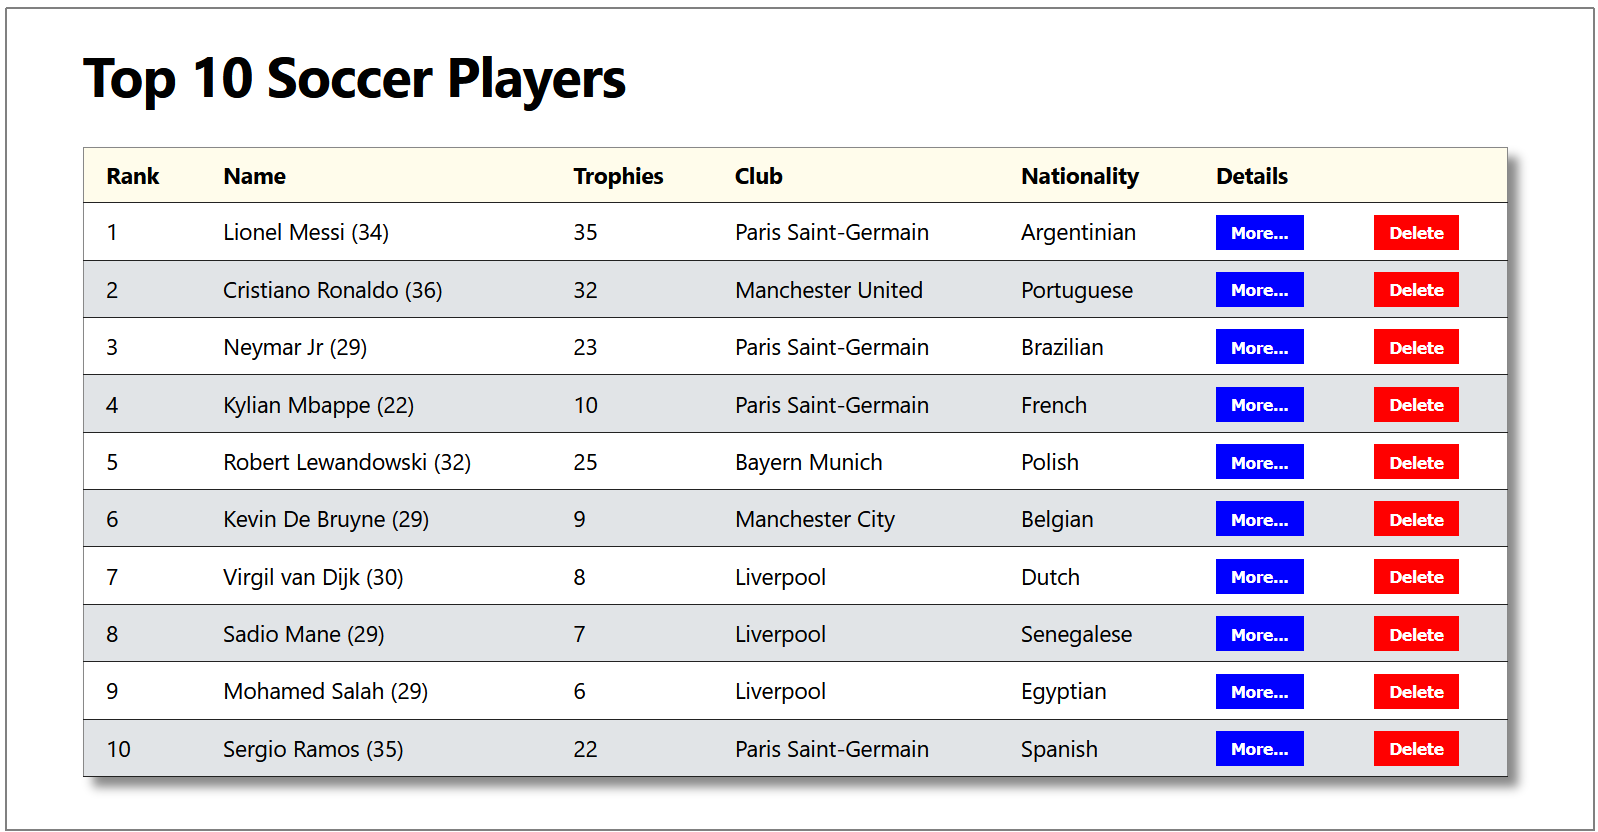
And your final player details screen should look like this.
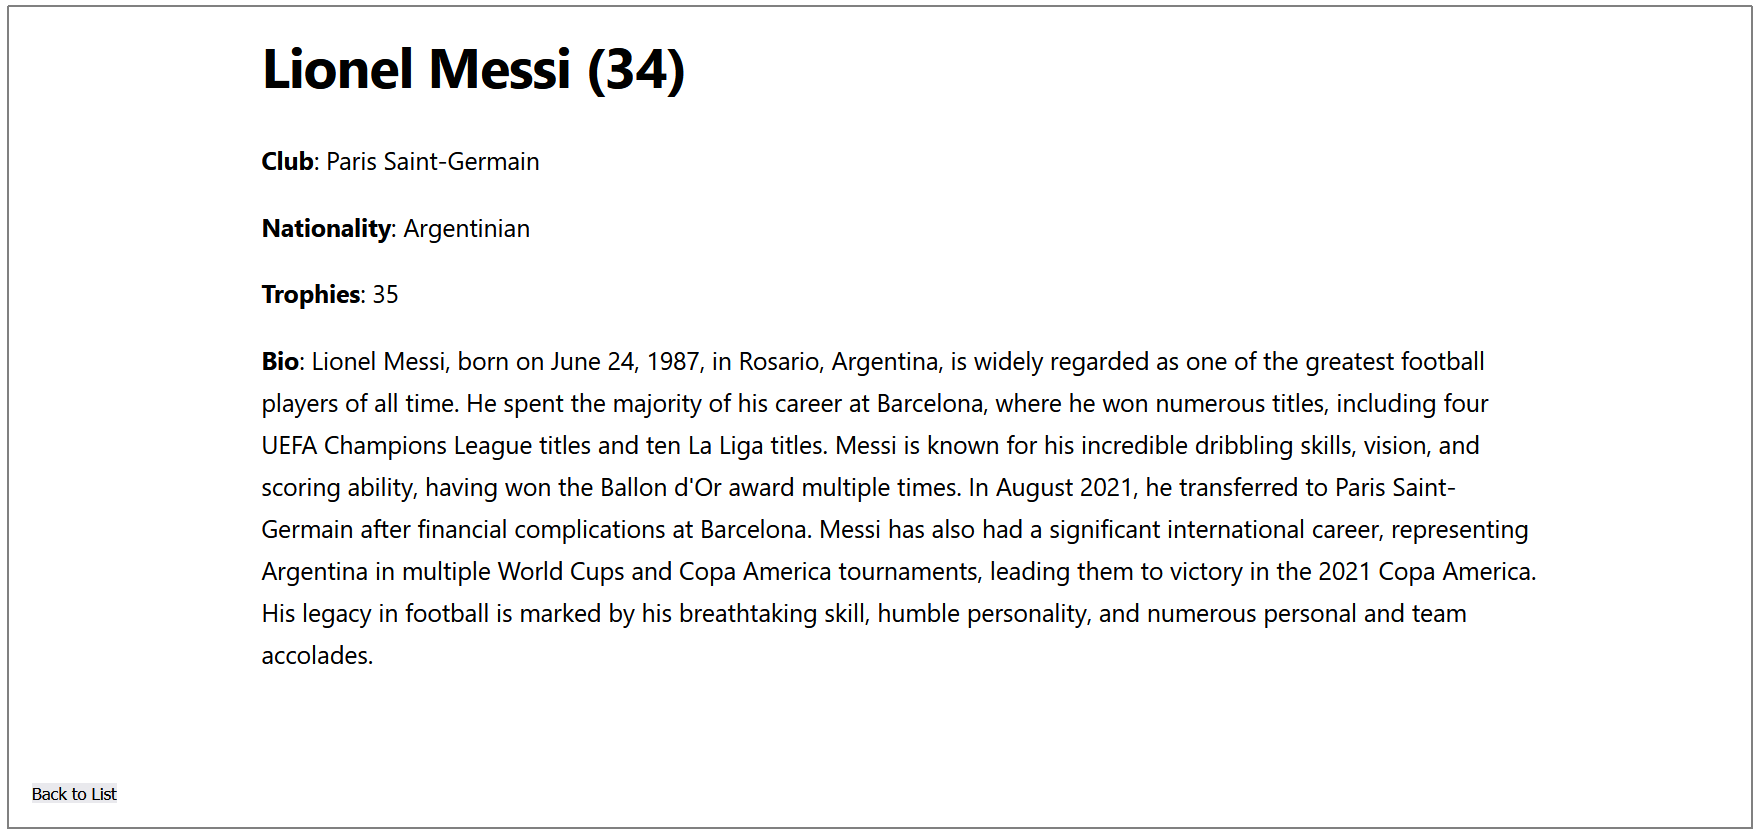
Deploying and downloading your app
For instructions on deploying your app to a remote server, see the link below:
Deploying apps to GitHub and GitHub Pages
Note that:
- You will need to deploy two versions of your app to two Git branches.
- One version will contain the code of your app. You deploy this to your default branch (named main or master) on GitHub.
- The second version is needed for your app to run on a remote server. You deploy this to the gh-pages branch on GitHub Pages.
Once you have deployed your app code on the main or master to GitHub, the app can then be downloaded by you (or anyone else) from GitHub to a local machine. See the link below:
Downloading and installing apps
The person who downloads the app code can then re-build and run your app on their local machine by running these two commands:
npm install
npm start