Learning Goals
At the end of this Tutorial, you will be able to:
- Add a middleware function to an Express app based on the jsonwebtoken and bcrypt packages, along with a secret key stored in your .env file.
- Apply this function to protect selected routes in your app so that only users provided with an authorisation token can access them.
Three options for protecting routes
- Basic authentication: Quickest and easiest solution that prompts users for a username and password. But these are sent to the server in plain text, which isn't secure for sensitive data. Should be used only for apps used internally within an organisation such as admin panels.
- Token-based authentication: Options such as JSON Web Tokens (JWT) store user information in encrypted format. These are sent with each request, eliminating the need to store passwords on the server.
- OAuth: For integrating apps with existing social media platforms or third-party authentication services. Users can log in without creating separate accounts on your app.
About JSON Web Tokens (JWTs)
A JWT (pronounced as "jot") is like a secure, encoded packet for containing user information. JWTs are compact, self-contained, and cryptographically signed.
With JWTs, you don't need to store passwords or maintain user sessions on the server. Note:
- Secure storage: JWTs should be stored securely on the client-side, typically in HttpOnly browser cookies.
- Token expiration: You need to set appropriate expiration times to prevent misuse.
- Refresh tokens: You also need to implement mechanisms for renewing expiring tokens.
Implementing route protection with JWTs
Here are the elements of a JWT-based authentication system in Express:
- User login: User provides credentials (username/password) to a login form.
- Authentication: Server verifies credentials and generates a signed JWT token based user data, such as ID and permitted role(s).
- Sending the JWT: Server sends the JWT back to the user as part of the response.
- Securing routes: Subsequent requests to protected routes include the JWT authorisation token.
- Validation: Server verifies the JWT's signature and extracts user information.
- Granting access: If valid, access is granted based on the user's data in the JWT.
Creating your folder structure
In a previous Tutorials, you created the folder structure shown below for four Express/MongoDB apps.

Copy the /app-mongodb-static folder and rename it to /app-mongodb-jwt.

Installing the JWT packages
You need to install four new Express packages for your app:
- Open a Command prompt or VS Code Terminal, and navigate to the folder that contains your app. For example:
cd apps-mongodb/app-mongodb-jwt/server - Install these four packages locally as follows:
npm i cookie-parser jsonwebtoken bcrypt express-jwt
These will update the package.json file and the node_modules subfolder.
Updating your package.json file
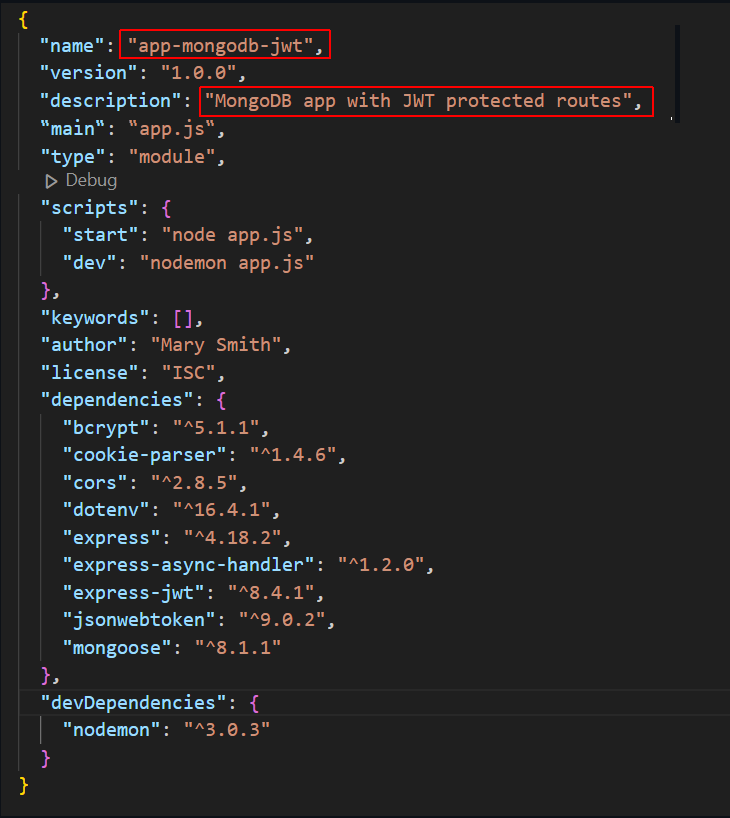
As a final step, open your package.json file and update it for your new MongoDB app as shown below.
Adding the JWT key to your .env file
Add your JWT_SECRET key to the details already stored in your .env file:

Choose a strong, hard-to-guess string of characters.
Adding JWT middleware to your app.js file
Next, import the JWT_KEY into your app.js file and use it to build a middleware function named verifyToken that will manage access to protected routes.
- Add the new statements as shown below:

- Add the following middleware function after the other app.use() middleware functions already present:
You include the export keyword because you will import his function into your routes files.// Middleware function for verifying JWT export function verifyToken(req, res, next) { console.log("Checking for token present in request header."); const authHeader = req.headers.authorization; const token = authHeader.split(' ')[1]; // JWT not present in header if (!token) { console.log("No token found. 401 error returned to client."); return res.status(401).send('Unauthorised access'); } try { console.log("Now verifying token."); const decoded = jwt.verify(token, secret); // Add decoded user information to req object req.user = decoded; console.log("Token verified."); next(); } catch (err) { console.log("Token is invalid. 403 error returned to client."); // JWT present in cookies but is invalid res.status(403).send('Invalid token'); } };
Updating your models, routes, and controllers files
You will now be using two files for models, routes and controllers. One set for players, and a second set for users. Follow these steps:
- Download these two files to your /models folder:
playerModel.js
userModel.js - Download these two files to your /routes folder:
playerRoutes.js
userRoutes.js - Download these two files to your /controllers folder:
playersControllers.js
usersControllers.js You can delete the original files from the three folders. - Update your app.js file as shown below:

Adding a new users database collection
You will now create a new, separate collection in your MongoDB database for users. Here are the steps:
- Save the JSON file below to your local machine. users_sample.json
- Launch MongoDB Compass and connect with your db_soccer_players database.
- Near the top-left of the screen, click the Create Collection button.
- Name the new collection users.
- Click the dropdown arrow on the ADD DATA button, select Import JSON or CSV file, and import the users_sample.json file.
 The first two documents in your new collection should look as shown below.
 You can now close the MongoDB Compass app.
As you can see, the user passwords are currently stored in plain-text, unhashed format.
In your terminal, verify that the app still runs without errors and connects with MongoDB successfully.
Applying the verifyToken function to routes
You will use the verifyToken() function from app.js to protect selected routes. Here are the steps:
- Open your PlayersRoutes.js file and add the new import statement below:

- You can now add the verifyToken middleware as an argument to any route you wish to protect. As an example, add this function to the // List all players route:

- Save your PlayersRoutes.js file and enter the following route in a web browser:
http://localhost:5000/soccer_players/list
- You should see the message below:

- In your PlayersRoutes.js file, remove the verifyToken argument from the // List all players route. Add it instead to the routes for adding, updating and deleting players. See below:

Testing players routes with Postman
Download and install the (free version) of the Postman app for testing server requests and responses.
Let's begin by testing the routes for the soccer players.
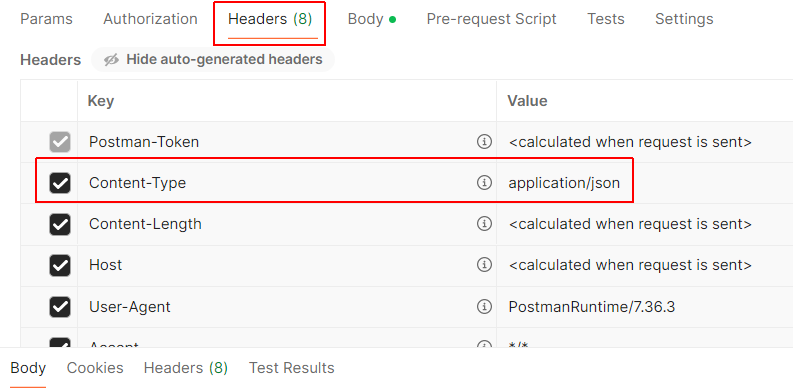
In Postman, click the Headers tab and ensure the Content-Type is set to application/json.
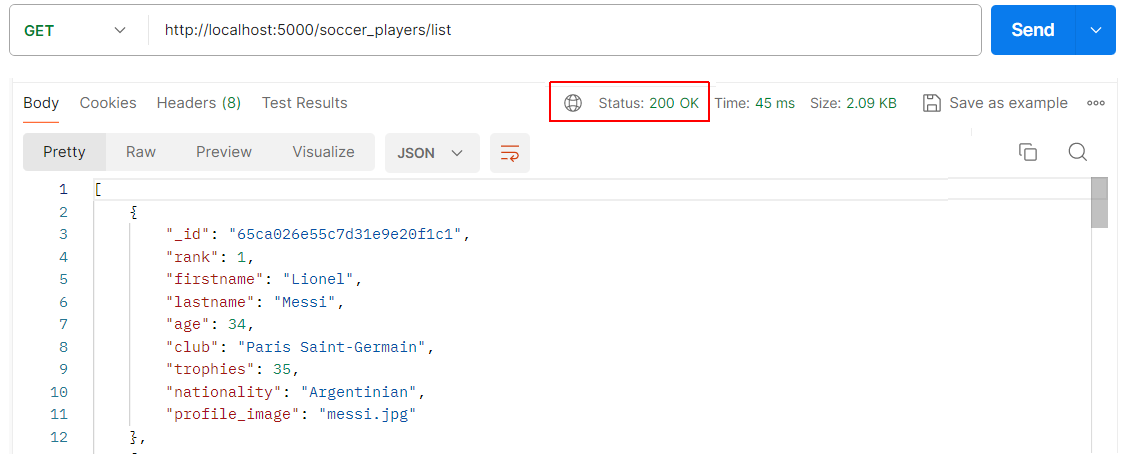
Now, test the list route for all players in the database collection. See below.
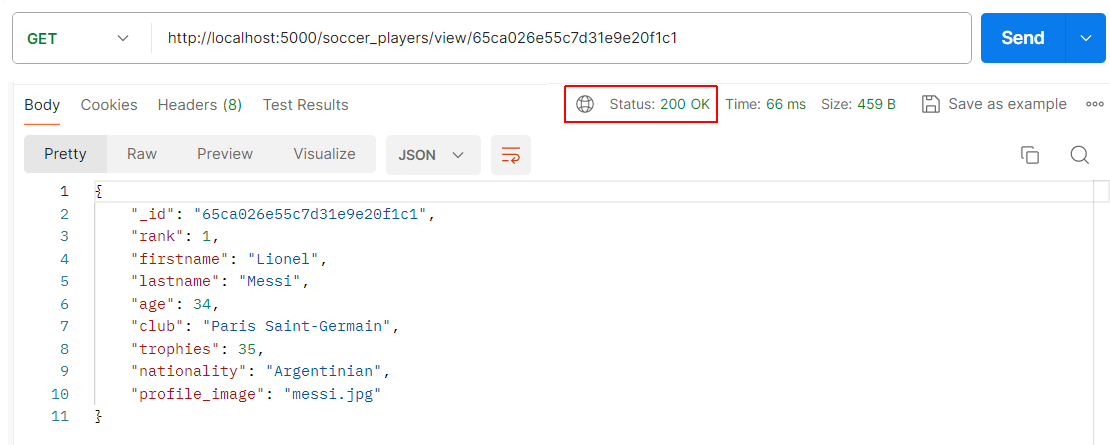
Next, verify the view route for a particular player.
Finally, verify the update route for a particular player. Because this route is protected by the verifyToken function, access will be denied and a 401 error returned.

Repeat the above step for the /soccer_players/add and /soccer_players/delete/<id> routes. You should receive a 401 error message for these two protected routes.
Testing user routes with Postman
You have two routes for users:
- The /soccer_players/users/login route for verifying and logging in existing users.
- And the /soccer_players/users/add route for adding new users.
In each case, you will need to send additional information in the request body to the server along with URL. For example, the user email and password.
Testing the add user route
Begin by testing the route for adding a new user.
In Postman, select the POST method and enter the URL for adding a new user.
Click the Body tab and select Raw. Next, click the JSON option and select JSON from the dropdown menu.
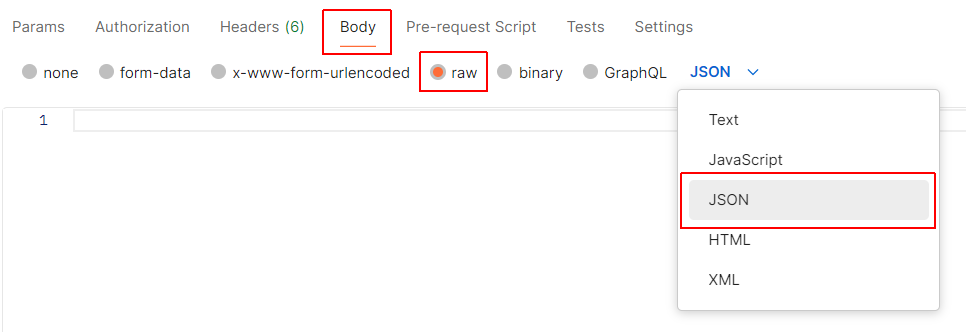
Now, enter a new user's details in JSON format. See the example below.
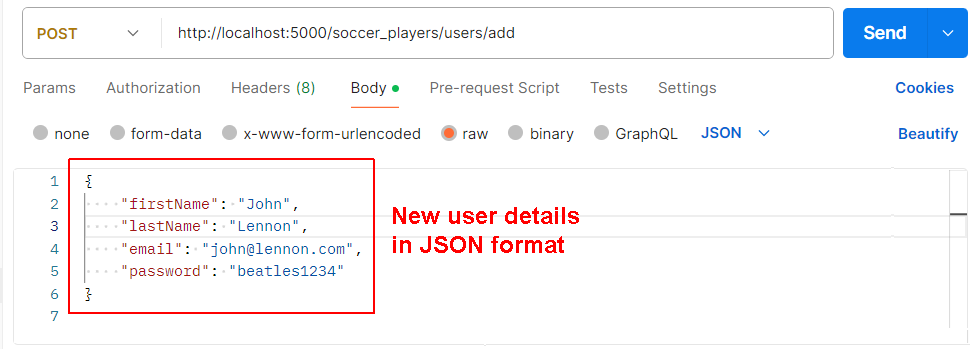
When you click Send, you can see that the user password is now stored in hashed format.

In MongoDB Compass or with the MongoDB extension for VS Code, verify the users collection has been updated with the new user.
Testing the user login route
Next, test that the new user can log in with their email and un-hashed password.

When you click Send, you can see that the user can successfully log in.

Also, the route returns to the client an authorisation token. The user can send this token to the server to enable access all protected routes for a time-limited duration.
Testing a protected players route
Next, test that a user with an authorisation token can access the protected update route for the players collection.
See the example below.
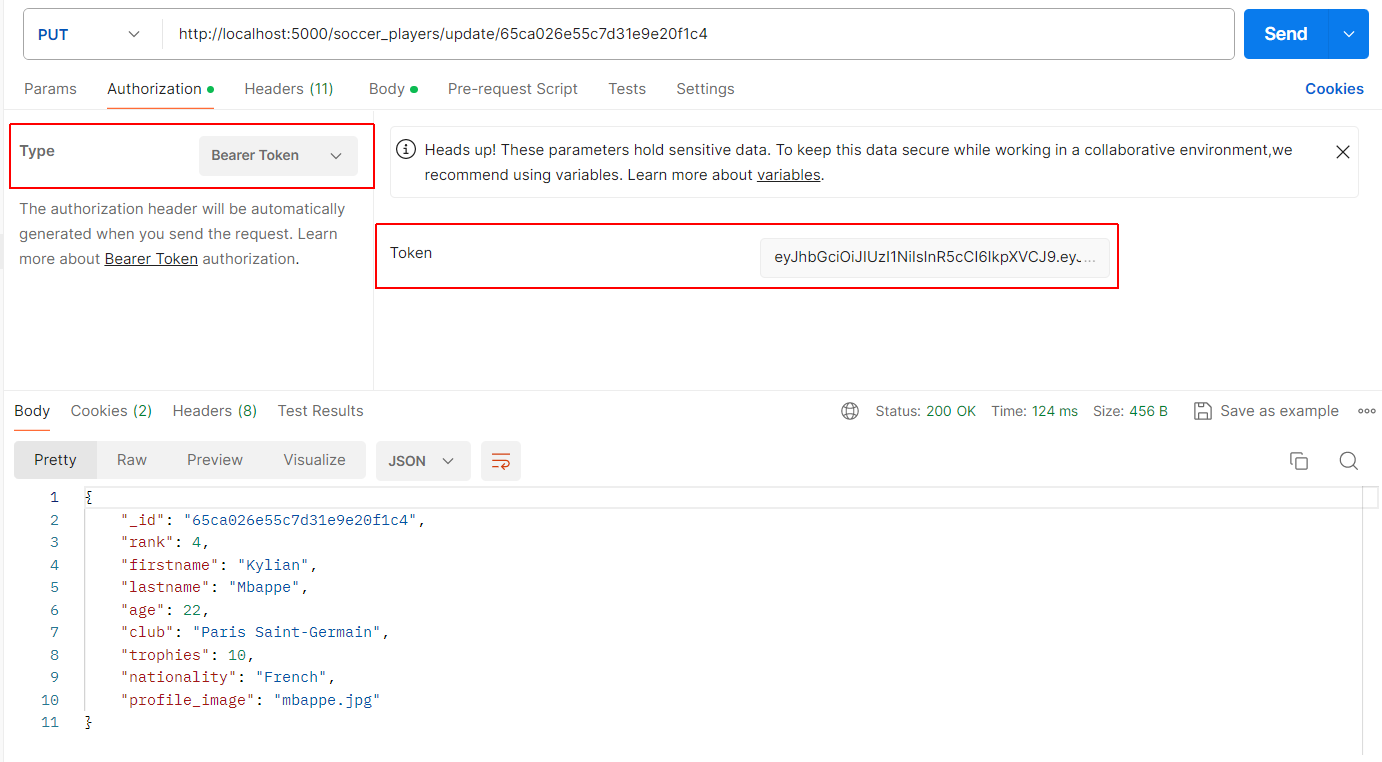
Choose the PUT method, and enter the update route and the unique _id of a particular soccer player.
Click the Authorisation tab. For the Type, select Bearer Token. Postman should display the token value in the Token field. Click Send.
Building the front-end
Enter the following in ChatGPT:
I have created an Express app with a MongoDB backend. The database has two collections - players and users.
The app have routes for listing all players and viewing details of a particular player. See below:
// List all players
router.get('/soccer_players/list', players_index);
// View selected player by id
router.get('/soccer_players/view/:id', player_get);
The app also has routes for creating a new player, editing a player's details, and deleting a player. See below:
// Add a new player
router.post('/soccer_players/add', verifyToken, player_add);
// Update a player selected by id
router.put('/soccer_players/update/:id', verifyToken, player_update);
// Delete a player selected by id
router.delete('/soccer_players/delete/:id', verifyToken, player_delete);
In the Express app code, I have protected these last three routes: add, update, and delete. Access is only permitted to users who supply an authorization token in their requests. The relevant function is in the app.js file and is shown below:
export function verifyToken(req, res, next) {
    console.log("Checking for token present in request header.");
    const authHeader = req.headers.authorization;
    const token = authHeader.split(' ')[1];
    // JWT not present in header
    if (!token) {
        console.log("No token found. 401 error returned to client.");
        return res.status(401).send('Unauthorised access');
    }
    try {
        console.log("Now verifying token.");
        const decoded = jwt.verify(token, secret);
        // Add decoded user information to req object
        req.user = decoded;
        console.log("Token verified.");
        next();
        } catch (err) {
            // JWT present in cookies but is invalid
            console.log("Token is invalid.");
            res.status(403).send('Invalid token');
    }
};
In my users database collection is a list of users with details of firstName, lastName, Email and Password.
Here is my Express app code for the user login form:
// Login user
const user_login = asyncHandler(async (req, res) => {
console.log("hello user login");
    try {
        const user = await UserModel.findOne({ email: req.body.email });
        if (!user) {
            return res.status(400).json({ message: 'Cannot find user' });
        }
        if (await bcrypt.compare(req.body.password, user.password)) {
            console.log(`Secret: ${secret}`); // Log the secret
            console.log(`User ID: ${user._id}`); // Log the user ID
            // User's email and password are correct
            // Generate a token for the user
            const token = jwt.sign({ id: user._id }, secret, { expiresIn: '1h' });
            // Send the token back to the client
            res.cookie('token', token, { httpOnly: true, maxAge: 3600000 });
            res.json({ message: 'Success', token: token });
        } else {
            res.status(403).json({ message: 'Not Allowed' });
        }
    } catch (error) {
        res.status(500).json({ message: error.message });
    }
});
I would like to build a single-page ReactJS app with routes for access the unprotected ist and view routes, and the protected create, update and delete routes. Can you suggest the appropriate code?