Learning Goals
At the end of this Tutorial, you will be able to:
- Write JavaScript to output structured data to a web page using a forEach() loop.
- Write AI prompts to output structured data in listview and gridview formats with Tailwind CSS.
For this Tutorial, you will start with an empty HTML file.
In your javascript/exercises folder, create a new HTML file named list-records-basic.html.
Create a new empty text file named list-records-basic.js and save it in this same folder.
Add a link to list-records-basic.js in your list-records-basic.html file using a <script> tag with the defer attribute.
Outputting structured data to HTML
In the previous Arrays of objects tutorial, you output a spreadsheet-style structured dataset such as the one below to the console.
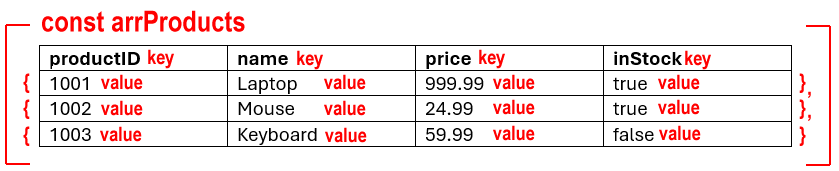
The dataset is an array of objects, where each object follows the usual key-value property structure. The objects could be products, users, locations or whatever.
In this tutorial, you will learn how to output this kind of structured data to a web page instead of the console. You will also learn how to format the output in a more readable way.
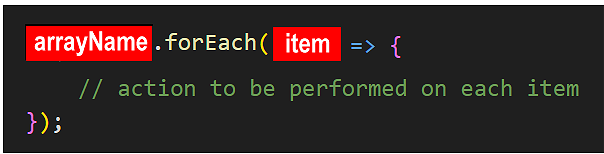
As with outputting data to the console, you will use the .forEach() loop to iterate through the array and display the data in a web page.
Building your script
Follow these steps:
- In your list-records-basic.js file, paste in the the sample dataset below.
Check your browser console to ensure the sample data is displaying correctly.// // Creating array of sample user data const arrUsers = [ { id: 1001, firstName: "Alice", lastName: "Smith", age: 25, city: "New York", isActive: true }, { id: 1002, firstName: "Bob", lastName: "Jones", age: 30, city: "Los Angeles", isActive: false }, { id: 1003, firstName: "Charlie", lastName: "Murphy", age: 35, city: "Chicago", isActive: true }, { id: 1004, firstName: "Diana", lastName: "Wilson", age: 28, city: "Houston", isActive: true }, { id: 1005, firstName: "Ethan", lastName: "Brown", age: 42, city: "Phoenix", isActive: false }, { id: 1006, firstName: "Fiona", lastName: "Davis", age: 31, city: "Philadelphia", isActive: true }, { id: 1007, firstName: "George", lastName: "Miller", age: 27, city: "San Antonio", isActive: true }, { id: 1008, firstName: "Hannah", lastName: "Garcia", age: 38, city: "San Diego", isActive: false }, { id: 1009, firstName: "Ian", lastName: "Rodriguez", age: 29, city: "Dallas", isActive: true }, { id: 1010, firstName: "Julia", lastName: "Martinez", age: 33, city: "San Jose", isActive: false } ]; console.log(arrUsers); - Use JavaScript to add a main heading to your linked web page.
Check your browser window to check the heading is displayed without error.// Add main heading container const mainHeadingContainer = document.createElement("header"); // Create h1 heading with text const mainHeading = document.createElement("h1"); mainHeading.innerText = "List of users"; // Inject h1 in heading container mainHeadingContainer.appendChild(mainHeading); // Inject heading container at top of web page document.body.appendChild(mainHeadingContainer); - Create and append a <div> element with an ID of display-output in HTML to hold the output from the dataset.
// Add container to hold data const displayOutput = document.createElement("div"); // Inject data container to web page under header document.body.appendChild(displayOutput); - Copy this code to output data from the arrUsers array of objects.
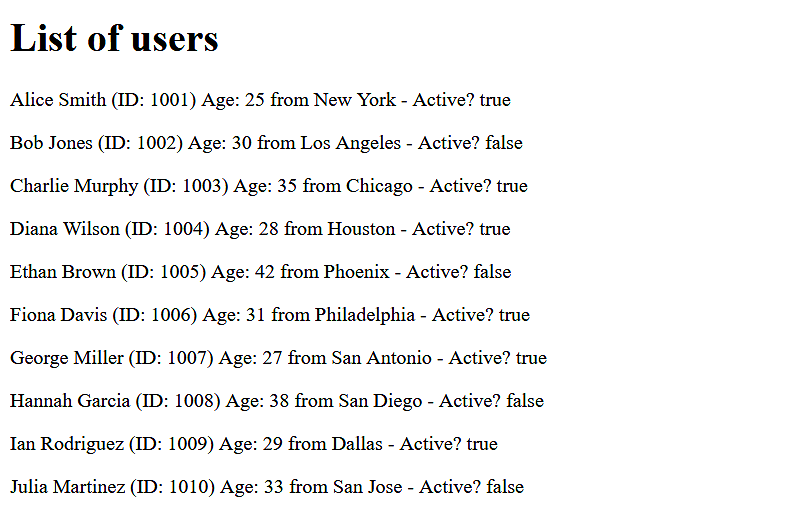
// Build HTML output with compound assignment and forEach() loop let htmlOutput = ''; // initial value is an empty string "" arrUsers.forEach(user => { htmlOutput += `<div><p>${user.firstName} ${user.lastName} (ID: ${user.id}) Age: ${user.age} from ${user.city} - Active? ${user.isActive} </p></div>`; }); // Inject the HTML output into the data container displayOutput.innerHTML = htmlOutput; - In your web browser you should see something like that below.
Adding CSS and improving the output
To make the output more readable, download the following CSS file to your javascript/exercises for folder and link your list-records-basic.html workfile to it.
Next, update your entire list-records-basic.js script with the code below.
// // Creating array of sample user data
const arrUsers = [
{ id: 1001, firstName: "Alice", lastName: "Smith", age: 25, city: "New York", isActive: true },
{ id: 1002, firstName: "Bob", lastName: "Jones", age: 30, city: "Los Angeles", isActive: false },
{ id: 1003, firstName: "Charlie", lastName: "Murphy", age: 35, city: "Chicago", isActive: true },
{ id: 1004, firstName: "Diana", lastName: "Wilson", age: 28, city: "Houston", isActive: true },
{ id: 1005, firstName: "Ethan", lastName: "Brown", age: 42, city: "Phoenix", isActive: false },
{ id: 1006, firstName: "Fiona", lastName: "Davis", age: 31, city: "Philadelphia", isActive: true },
{ id: 1007, firstName: "George", lastName: "Miller", age: 27, city: "San Antonio", isActive: true },
{ id: 1008, firstName: "Hannah", lastName: "Garcia", age: 38, city: "San Diego", isActive: false },
{ id: 1009, firstName: "Ian", lastName: "Rodriguez", age: 29, city: "Dallas", isActive: true },
{ id: 1010, firstName: "Julia", lastName: "Martinez", age: 33, city: "San Jose", isActive: false }
];
console.log(arrUsers);
// Add main heading container
const mainHeadingContainer = document.createElement("header");
// Create h1 heading with text
const mainHeading = document.createElement("h1");
mainHeading.innerText = "List of users";
// Inject h1 in heading container
mainHeadingContainer.appendChild(mainHeading);
// Inject heading container at top of web page
document.body.appendChild(mainHeadingContainer);
// Add DIV container to hold data
const displayOutputDIV = document.createElement("div");
// Add CSS class to data container for styling
displayOutputDIV.classList.add("data-output");
// Inject data container to web page under header
document.body.appendChild(displayOutputDIV);
// Build HTML output with compound assignment and forEach() loop;
let htmlOutput = ''; // initial value is an empty string ""
let userStatus; // variable to display user active or inactive
let totalUsers = arrUsers.length; // variable to hold total number of users for later display
let totalAge = 0; // variable to hold total age of all users for later display
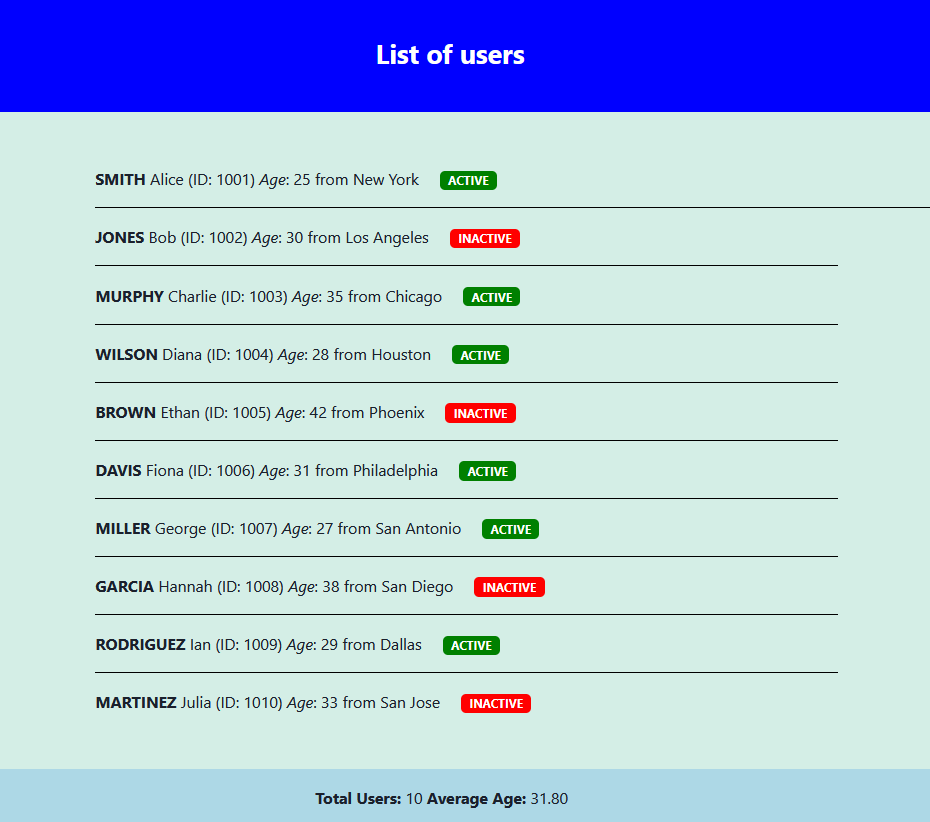
arrUsers.forEach(user => {
// Check status of user and assign text to userStatus variable with CSS classes for styling
userStatus = user.isActive ? "<span class='active-user'>ACTIVE</span>" : "<span class='inactive-user'>INACTIVE</span>";
htmlOutput += `<div><p>
<b>${user.lastName.toUpperCase()}</b> ${user.firstName} (ID: ${user.id}) <i>Age</i>: ${user.age} from ${user.city} ${userStatus}
</p></div>`;
// Add this user's age to totalAge
totalAge += user.age;
});
// Inject the HTML output into the data container
displayOutputDIV.innerHTML = htmlOutput;
// Append the data container to the body
document.body.appendChild(displayOutputDIV);
// Outside the loop, display the total numbers of users and their average age
const averageAge = totalAge / totalUsers;
// Create a new DIV to hold the totals output
const totalsOutputDiv = document.createElement("div");
// Add CSS class to totals output DIV for styling
totalsOutputDiv.classList.add("totals-output");
// Create a new paragraph element to display the totals and average age
const totalsOutput = document.createElement("p");
// Set the innerHTML of the totals output paragraph with total users and average age, using toFixed(2) to limit average age to 2 decimal places
totalsOutput.innerHTML = `<p><b>Total Users:</b> ${totalUsers} <b>Average Age:</b> ${averageAge.toFixed(2)}</p>`;
// Append the totals output paragraph to the totals output DIV
totalsOutputDiv.appendChild(totalsOutput);
// Append the totals output DIV to the body of the web page, under previous content
document.body.appendChild(totalsOutputDiv);Unfortunately, the HTML output still does not look very professional.
Listview and gridview
JavaScript frontends often use listview and gridview components to display structured data in an organised and visually appealing way.
- Listview: Displays data in a vertical list, with each record on a separate line. This is ideal for displaying simple lists of items, such as names, contact lists and message threads.
On wider viewports, a listview typically displays column labels in the first row. On mobile screens, these column labels are usually hidden or displayed differently to save space.
- Gridview: Displays data in a responsive, multi-column grid format. This is useful for displaying more complex data with multiple attributes, such as online shops or photo galleries.
Both listview and gridview allow for sorting, filtering, and pagination.
Tailwind CSS is often used to style these components for a modern and responsive design.
Building a listview output with Tailwind CSS
Copy and run the following AI prompt.
I want to generate a simple listview component using Tailwind CSS to display a list of products. The listview should be responsive and look good on both desktop and mobile devices. Please provide the HTML structure and the necessary Tailwind CSS classes to achieve this design.
*** FILE STRUCTURE ***
Create two files: list-listview.html and list-listview.js. The HTML file should include the necessary Tailwind CSS CDN link and a container for the listview. The JavaScript file should contain code to generate sample product data and dynamically create the listview items based on that data.
*** SAMPLE DATA ***
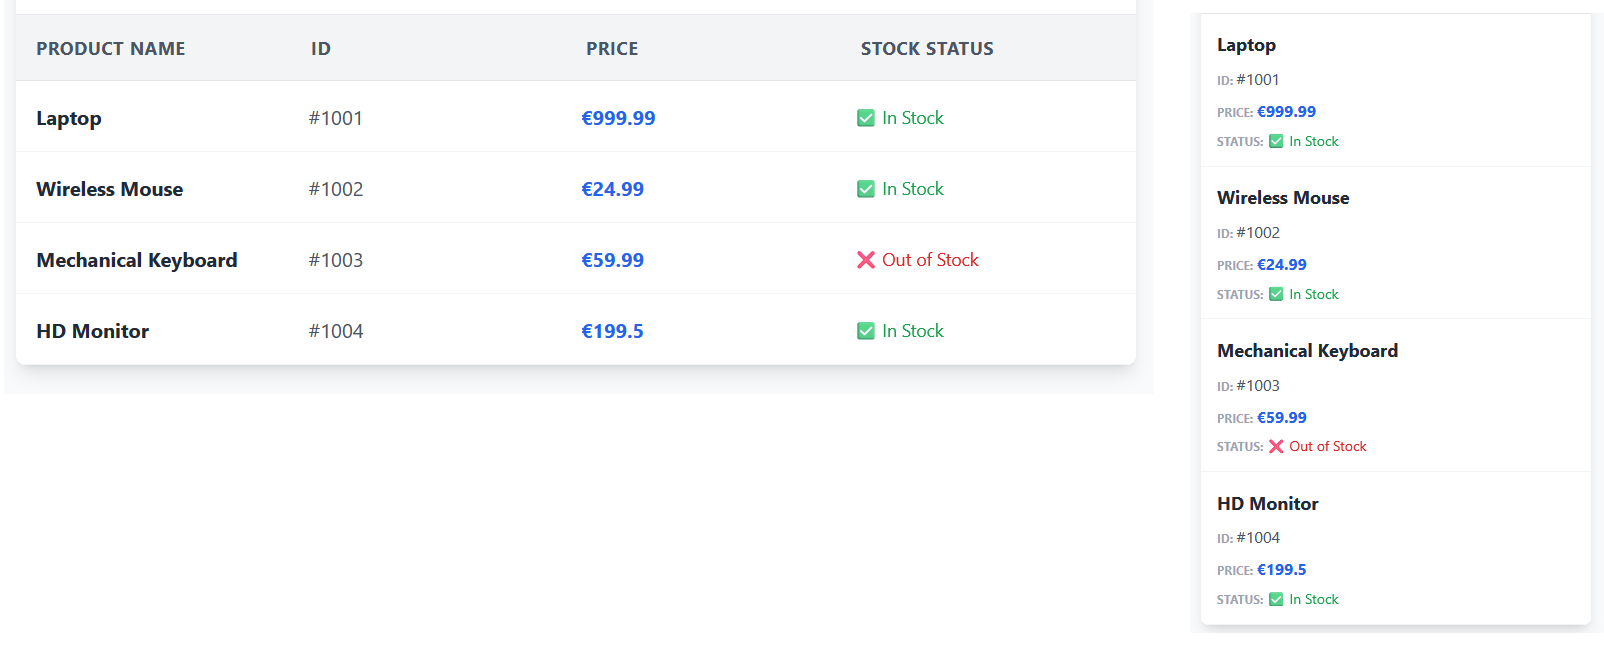
Generate a sample dataset of 10 products with the following properties:
- name (string)
- price (number)
- availability (boolean)
*** UI ***
On wider viewports, the listview should display column labels for each property.
On mobile screens, these column labels should be hidden to save space, and the product name should be displayed prominently with the price and availability information below it.
Use a modern, dark and clean design with Tailwind CSS, ensuring that the listview is visually appealing and easy to read on all devices.
Use blue as the accent colour for product names, and green for available products and red for unavailable products.
Centre the listview on the page with a maximum width (e.g., max-w-4xl).
Please provide the complete code for both the HTML and JavaScript files.
Your listview output should look like this:
Building a gridview output with Tailwind CSS
Copy and run the following AI prompt.
I want to generate a simple datagrid component using Tailwind CSS to display a list of products. The gridview should be responsive and look good on both desktop and mobile devices. Please provide the HTML structure and the necessary Tailwind CSS classes to achieve this design.
*** FILE STRUCTURE ***
Create two files: list-gridview.html and list-gridview.js. The HTML file should include the necessary Tailwind CSS CDN link and a container for the gridview. The JavaScript file should contain code to generate sample product data and dynamically create the gridview items based on that data.
*** SAMPLE DATA ***
Generate a sample dataset of 10 products with the following properties:
- name (string)
- price (number)
- availability (boolean)
*** UI ***
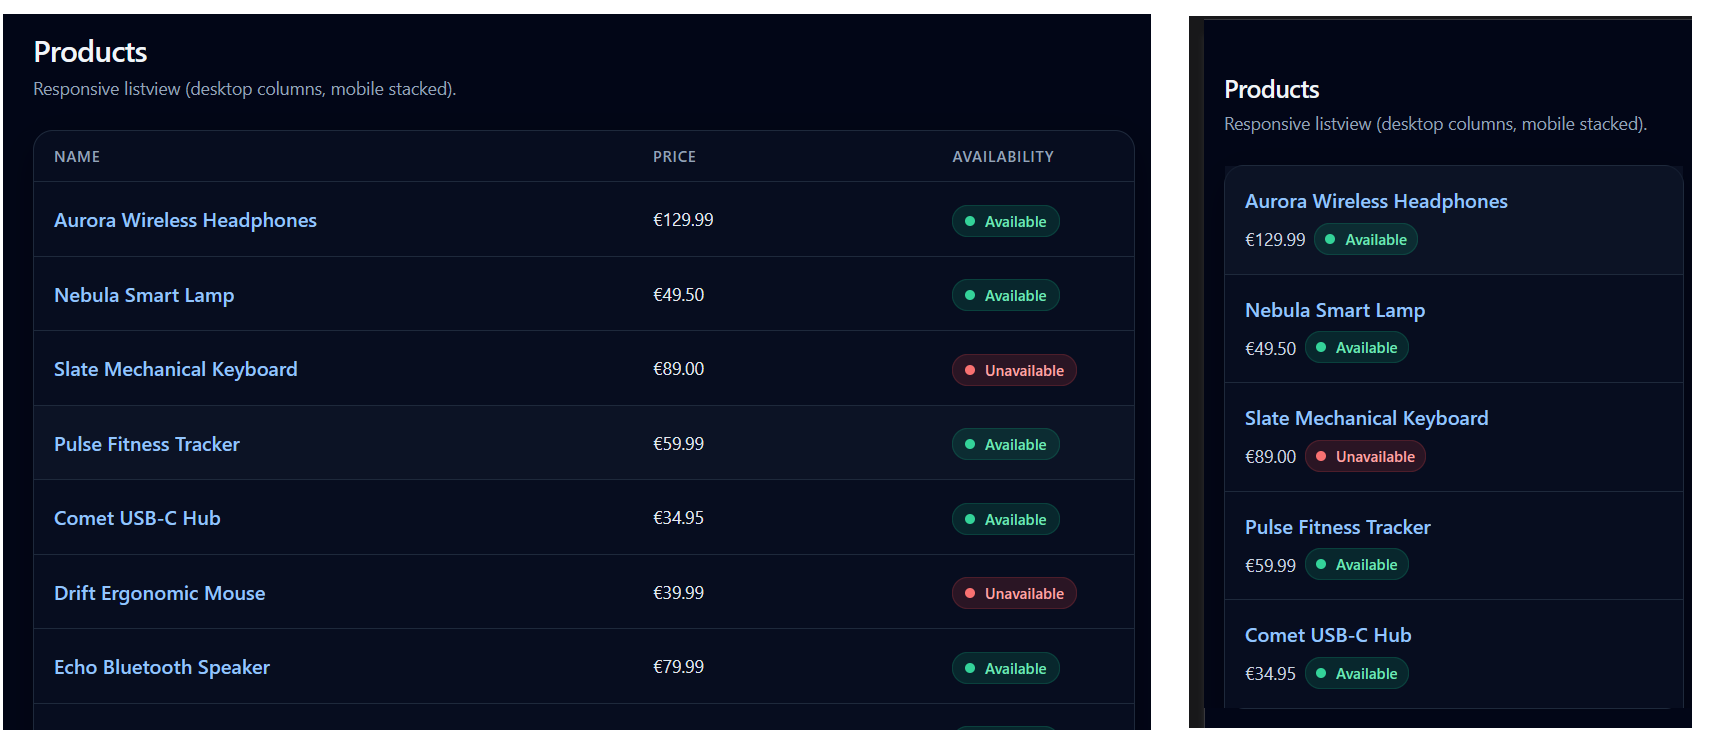
On wider viewports, the gridview should display multiple columns.
On mobile screens, display only a single column.
Use a modern, dark and clean design with Tailwind CSS, ensuring that the gridview is visually appealing and easy to read on all devices.
Use blue as the accent colour for product names, and green for available products and red for unavailable products.
Please provide the complete code for both the HTML and JavaScript files.
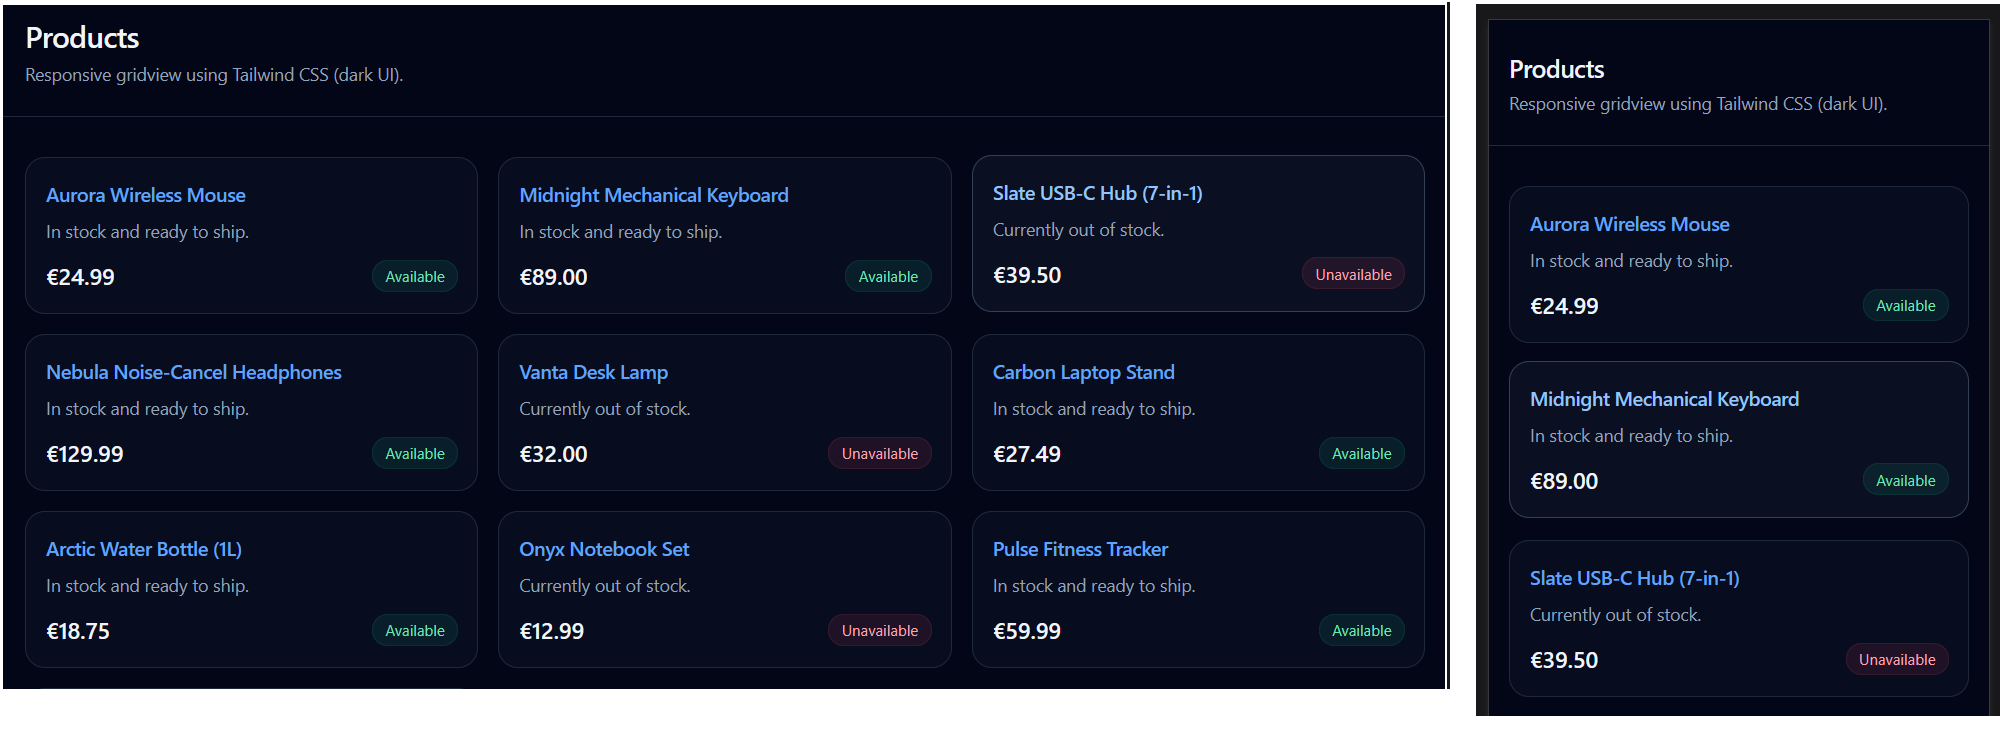
Your gridview output should look like this:
Try it yourself
In your workfile...
---
Create an array called arrBooks with at least four book objects. Each book object should have these properties:
- title (string)
- author (string)
- year (number)
- isRead (boolean)
You can use AI to generate the details.
Using a .forEach() loop, display each book's information in the browser.
Using Tailwind CSS, display your arrBooks data in a simple listview.
On desktop screens:
Show column labels (Title, Author, Year, Status).
On mobile screens:
Hide column labels and stack the information vertically.
More learning resources
Tutorial Quiz
Tutorial Podcast
Sample AI prompts
I'm learning about arrays of objects in JavaScript. Could you help me understand them better by:

                      - Creating an example array of objects representing a playlist of songs

                      - Explaining how each part of the syntax works (brackets, braces, commas, etc.)

                      - Showing me how to access specific properties like the title of the second song

                      - Demonstrating how to loop through the array with .forEach() and display the data

                      - Please explain each step as if you're teaching a beginner.