Project Goals
In this fourth stage of the MERN project, you will:
- Add a NavBar component that will display on all pages of the frontend app.
- Add components and pages to support updating and deleting product data for the MongoDB database.
Adding AddProduct and ProductUpdate components
Follow these steps to create components for adding a new product and updating an existing one.
- In your frontend/src/components sub-folder, download the following two files: AddProduct.jsx UpdateProduct.jsx
-
In your frontend/src/pages sub-folder, create a new text
file named AddProductPage.jsx and paste the code below into
it:
import React, { useEffect, useState } from "react"; import NavBar from "../components/NavBar"; import AddProduct from "../components/AddProduct"; const AddProductPage = () => { return ( <> <NavBar /> <AddProduct /> </> ); }; export default AddProductPage; -
Also in your frontend/src/pages sub-folder, create a new
text file named UpdateProductPage.jsx and paste the code
below into it:
import React, { useEffect, useState } from "react"; import NavBar from "../components/NavBar"; import UpdateProduct from "../components/UpdateProduct"; const UpdateProductPage = () => { return ( <> <NavBar /> <UpdateProduct /> </> ); }; export default UpdateProductPage; -
In your frontend/src sub-folder, update your
App.jsx file with the code below:
// Import Route and Routes from the React router library import { Route, Routes } from "react-router-dom"; import HomePage from "./pages/HomePage"; import AddProductPage from "./pages/AddProductPage"; import UpdateProductPage from "./pages/UpdateProductPage"; function App() { return ( <Routes> {/* Use Home component for the root path */} <Route index element={<HomePage />} /> <Route path="/addProduct" element={<AddProductPage />} /> <Route path="/update/:id" element={<UpdateProductPage />} /> </Routes> ); } export default App;
Updating your ProductCard component
In order to implement the update and delete functionalities, you need to make some modifications to ProductCard.jsx in your frontend/src/components sub-folder.
-
Add four new import statements to the top of the file:
import CardActions from "@mui/material/CardActions"; import { Button } from "@mui/material"; import { useNavigate } from "react-router"; import axios from "axios"; -
Now, inside the ProductCard function, add a
handleUpdate function that is responsible for navigating to
the update page when called.
// Use the useNavigate hook from react-router-dom to get the navigate function const navigate = useNavigate(); const handleUpdate = (id) => { // Use the navigate function to go to the update page for the product with the given ID navigate("/update/" + id); }; -
Next add a handleDelete function:
const handleDelete = async (id) => { try { const response = await axios.delete("http://localhost:5000/delete/" + id); console.log(response.data); // If the server responds with "Product deleted!", call the getProduct function from the props // This will likely refresh the list of products if (response.data === "Product deleted!") { props.getProduct(); } } catch (e) { console.log(e); } }; -
Finally, after closing the </CardContent> tag,
include the CardActions component below:
<CardActions> <Stack direction="row" gap={2}> <Button color="primary" variant="contained" onClick={() => handleUpdate(product._id)} > Update </Button> <Button color="error" variant="contained" onClick={() => handleDelete(product._id)} > Delete </Button> </Stack> </CardActions>
With these changes, the card component is now able to offer product update and delete functions.
Adding the NavBar to HomePage.jsx
Finally, add the NavBar component to your HomePage.jsx file the frontend/src/pages/ folder as shown below.


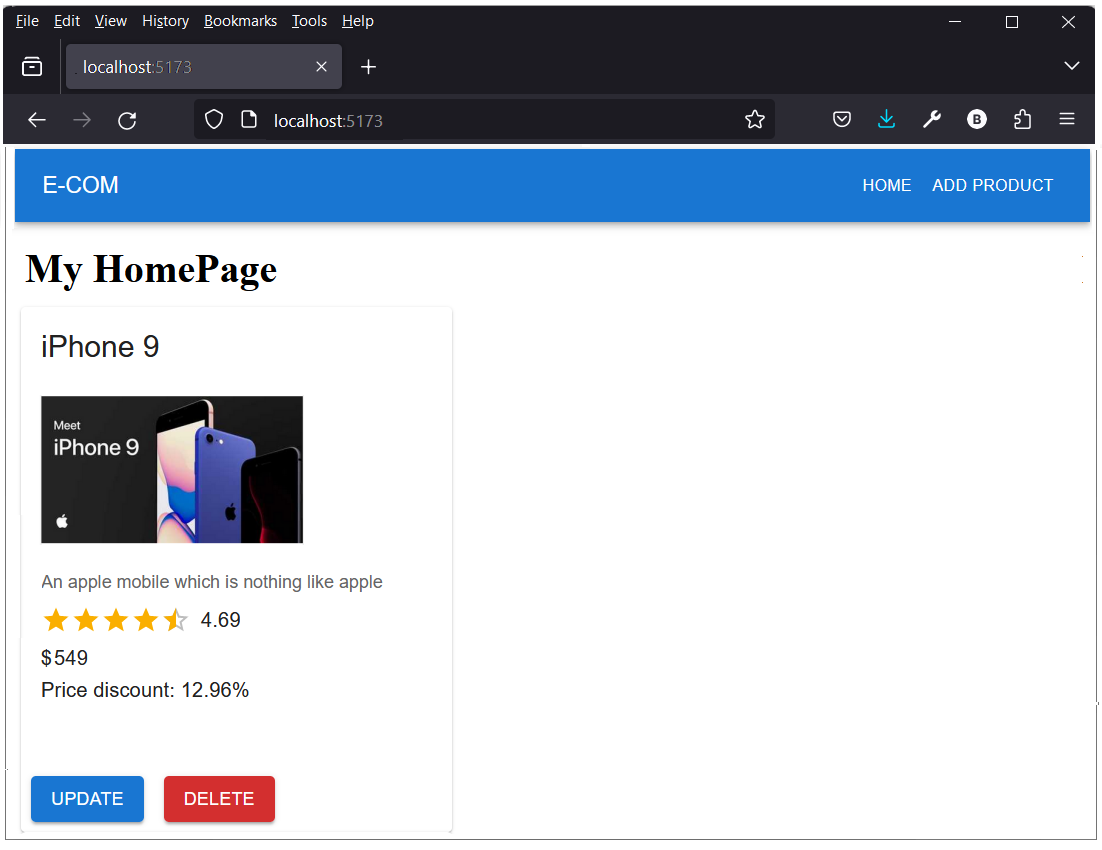
In your web browser, your frontend home page should now look like that below.

Project checklist and next step
Before continuing:

CHECK that the UPDATE button on your frontend home page works correctly.
CHECK that the DELETE button on your frontend home page works correctly.
CHECK that the ADD PRODUCT link in the NavBar on your frontend home page displays the Add Product page.
You are now ready to
move your product routes to a separate file and the base route
URL to a configuration file.