Learning Goals
At the end of this Tutorial, you will be able to:
- Apply the container class.
- Use the grid layout.
Working with a sample page
In this Tutorial you experiment with layout features using the ReactJS app you created in Introduction to TailwindCSS.
Responsive breakpoints
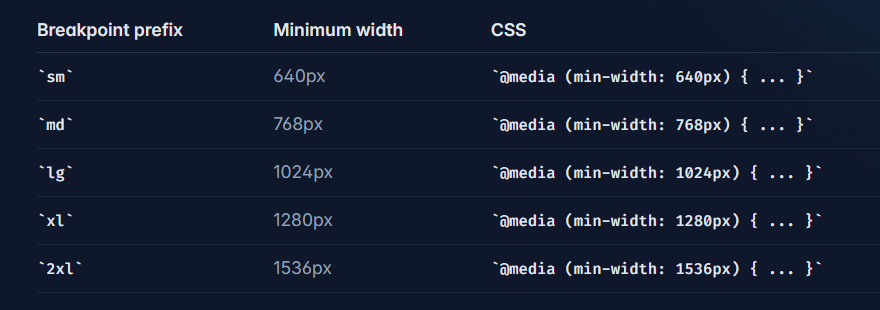
By default, Tailwind provides a number of responsive breakpoints. These enable you to define specific screen sizes at which styles should be applied differently.

Each has a corresponding minimum width value. For example, the md breakpoint targets screens with a minimum width of 768px.
To apply styles only at specific breakpoints and above, you prefix utility classes with the breakpoint name followed by a colon (:).
For example, if you want a button to have a blue background on medium screens and larger, you'd use the class bg-blue-500 md:bg-green-500. Here:
- bg-blue-500 applies the blue background by default (on all screens).
- md:bg-green-500 overrides the background color to green specifically on medium screens (and larger) due to the md prefix.
The container class
Tailwind provides a container class that links an HTML element's width to the current breakpoint. This class sets the max-width of an element to match the min-width of the current breakpoint.
Follow these steps:
- Create a new sub-folder named /pages in your project /src folder.
-
Create a new component LayoutExample.jsx in the
/src/pages sub-folder with the content
content.
import React from 'react'; import { BeakerIcon } from "@heroicons/react/24/solid"; const LayoutExample = () => { return ( <> <section className="container mx-auto my-16 bg-slate-200 p-6 py-6 text-left shadow-xl"> <h2>Tailwind container</h2> <p> Lorem ipsum dolor sit amet consectetur adipisicing elit. Deserunt commodi repellendus aliquam illo ut temporibus voluptatum totam iste vitae doloremque ipsum officiis, autem dolore earum praesentium? Quae voluptatum maxime at? </p> </section> <section className="container mx-auto my-16 bg-green-200 p-6 py-6 text-left shadow-lg hover:shadow-green-500/40"> <h2>Tailwind container</h2> <p> Lorem ipsum dolor sit amet consectetur adipisicing elit. Deserunt commodi repellendus aliquam illo ut temporibus voluptatum totam iste vitae doloremque ipsum officiis, autem dolore earum praesentium? Quae voluptatum maxime at? </p> </section> <div className="container-bleed container mx-auto my-16 px-0 py-6"> <p className="text-left text-white"> Horem ipsum dolor sit amet consectetur, adipisicing elit. Totam repudiandae adipisci dolores amet. Aspernatur accusantium similique fugit esse enim maiores quis error distinctio consectetur asperiores? Inventore praesentium error illo rem! </p> </div> <section className="container mx-auto my-6 grid grid-cols-4 gap-8 text-left"> <div className="bg-blue-200 p-6 py-6"> <p> Lorem ipsum dolor sit amet consectetur, adipisicing elit. Totam repudiandae adipisci dolores amet. Aspernatur accusantium similique fugit esse enim maiores quis error distinctio consectetur asperiores? Inventore praesentium error illo rem! </p> <button className="btn btn-blue">Button</button> </div> <div className="bg-blue-200 p-6 py-6"> <p> Lorem ipsum dolor sit amet consectetur, adipisicing elit. Totam repudiandae adipisci dolores amet. Aspernatur accusantium similique fugit esse enim maiores quis error distinctio consectetur asperiores? Inventore praesentium error illo rem! </p> <button className="btn btn-blue">Button</button> </div> <div className="bg-blue-200 p-6 py-6"> <p> Lorem ipsum dolor sit amet consectetur, adipisicing elit. Totam repudiandae adipisci dolores amet. Aspernatur accusantium similique fugit esse enim maiores quis error distinctio consectetur asperiores? Inventore praesentium error illo rem! </p> <button className="btn btn-blue">Button</button> </div> <div className="bg-blue-200 p-6 py-6"> <p> Lorem ipsum dolor sit amet consectetur, adipisicing elit. Totam repudiandae adipisci dolores amet. Aspernatur accusantium similique fugit esse enim maiores quis error distinctio consectetur asperiores? Inventore praesentium error illo rem! </p> <button className="btn btn-blue flex items-center"> Click me <BeakerIcon className="ml-2 h-6 w-6" /> </button> </div> </section> </> ); }; export default LayoutExample; -
Add the following CSS to index.css:
.container-bleed { position: relative; } .container-bleed:before { content: ""; z-index: -1; position: absolute; top: 0; bottom: 0; left: -100vw; right: -100vw; background: inherit; @apply bg-blue-800; } .btn { @apply mt-4 rounded px-4 py-2 font-bold; } .btn-blue { @apply bg-blue-500 text-white; } .btn-blue:hover { @apply bg-blue-700; } -
Add this new component to app.jsx:
import React from 'react'; import './App.css'; import LayoutExample from './pages/LayoutExample'; function App() { return ( <div className="App"> <h1 className="text-3xl text-red-600 font-bold underline"> Hello, TailwindCSS! </h1> <LayoutExample /> </div> ); } export default App;